Travis Lytle - embedded linux notes
Saturday, April 23, 2016
Yocto Kernel config
bitbake -c menuconfig virtual/kernel
bitbake -c compile virtual/kernel
bitbake -c install virtual/kernel
Monday, January 18, 2016
Qt5 Creator files to deploy
To add files (or in this case the actual qt executable file) to the embedded device, they need to be added to the *.pro file. The example below shows a basic qttest application being added to the root folder.
Deployment step to kill Qt5 running process
Normally when running your Qt application on a remote linux device, once it's started it needs to be killed before you re-upload and run it. The easiest way to do this is to add a step to kill the process before uploading. See the picture below, and the section labeled Run custom remote command. This will prevent you from having to shell into the embedded device and manually killing the process.
Wednesday, January 6, 2016
Nitrogen6_MAX yocto krogoth Qt5
How I got Qt5 working on nitrogen6_max using yocto krogoth
note of caution: I've only tested this very little. I'm not sure if everything I've done is correct.
I'm using Debian 8 as my host system.
Install dependencies:
apt-get install gawk wget git-core diffstat unzip texinfo gcc-multilib build-essential chrpath socat libsdl1.2-dev xterm
Install repo:
su to root
curl http://commondatastorage.googleapis.com/git-repo-downloads/repo > /usr/bin/repo
chmod a+x /usr/bin/repo
Get Yocto krogoth:
mkdir ~/krogoth
cd ~/krogoth
repo init -u http://github.com/boundarydevices/boundary-bsp-platform -b krogoth
repo sync
Setup directories:
sudo mkdir -p /opt/freescale/yocto/imx
sudo mkdir -p /opt/freescale/yocto/sstate-cache
sudo chmod -R 777 /opt/freescale
Build krogoth:
cd ~/krogoth
MACHINE=nitrogen6x . setup-environment core-image-base
update the following file: ~/krogoth/core-image-base/conf/local.conf
using this file: local.conf
bitbake core-image-base
Build Qt5 toolchain:
bitbake meta-toolchain-qt5
Put the sdcard image on a sdcard:
cd ~/krogoth/core-image-base/tmp/deploy/images/nitrogen6x/
su to root
umount /dev/sd*
zcat core-image-base-nitrogen6x.sdcard.gz | dd of=/dev/sd* bs=1M
* needs to be replaced with your drive letter for your sdcard, example /dev/sde1, /dev/sde2, etc)
Once this is done, you can insert sdcard into nitrogen6 and power / boot the device.
Install qt5 toolchain sdk:
cd ~/krogoth/core-image-base/tmp/deploy/sdk
sudo ./poky-glibc-x86_64-meta-toolchain-qt5-cortexa9hf-neon-toolchain-2.1.sh
Note enviroment setup script:
. /opt/poky/2.1/environment-setup-cortexa9hf-neon-poky-linux-gnueabi
Install Qt creator:
download and install - http://www.qt.io/download-open-source/
To start qt creator, I created a script call start_qtc, with the following inside:
. /opt/poky/2.1/environment-setup-cortexa9hf-neon-poky-linux-gnueabi
~/Qt/Tools/QtCreator/bin/qtcreator
Then change it to an executable
chmod +x start_qtc
Setting up qt creator environment:
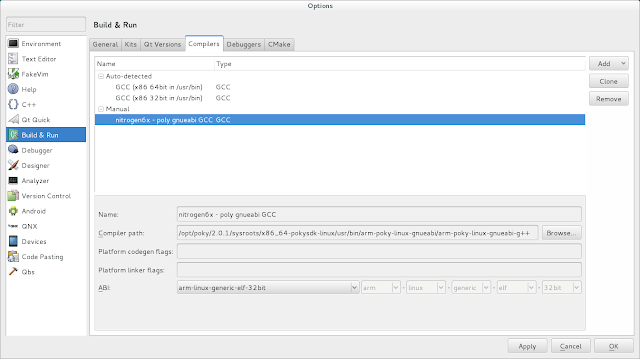
This is easiest to show in pictures, because there is a lot going on.
I've used pieces from the following websites:
https://boundarydevices.com/jethro-release-of-yocto/
https://community.freescale.com/thread/309578
http://wiki.wandboard.org/index.php/Building_Qt5_using_yocto_on_Wandboard
Sunday, February 26, 2012
Beaglebone Pinout
I pulled the beaglebone pinout information from beaglebone SRM and put it in a spreadsheet for easy lookup.
OpenDocument: beaglebone pins.ods
OpenDocument: beaglebone pins.ods
Getting on the Beaglebone on the internet using networking over usb
Here are the settings to get the beaglebone to network over usb. This setup assumes that your router has an ip address of 192.168.1.1
on host
iptables --table nat --append POSTROUTING --out-interface wlan0 -j MASQUERADE
iptables --append FORWARD --in-interface eth1 -j ACCEPT
echo 1 > /proc/sys/net/ipv4/ip_forward
on beaglebone
route add default gw 192.168.7.1
vi /etc/resolv.conf
nameserver 192.168.1.1
I'm not sure if all of this is needed, but I know it works
These settings are going to vary depending on your internet interface (wlan0, eth0, etc.) and the settings on your router (192.168.1.1, 192.168.0.1).
Subscribe to:
Comments (Atom)


